
 Автор:
 Содержание:
Итак, к этому моменту вы защитили вашу систему Ubuntu от физических атак, нудных сетевых хакеров и изолировали потенциально вредоносные приложения. Прекрасно! Следующий логический шаг по настройке и укреплению вашей ОС будет включать в себя тщательный аудит Ubuntu на наличие слабых мест, использование антивирусного программного обеспечения, которое уважает вашу конфиденциальность, а также мониторинг системных логов.
Это заключительная часть нашей мини-серии по тонкой настройке и укреплению вашей системы Ubuntu. Из этой статьи вы узнаете об усилении защиты слабых мест в ОС с помощью хорошо зарекомендовавшего себя опенсорсного инструмента для аудита. Помимо этого, мы посмотрим на ClamAV, антивирусное программное обеспечение, которое не отправляет ваши конфиденциальные файлы на сервера коммерческих компаний. Кроме того, вы увидите, каким образом можно разрешить или запретить доступ в Интернет любому приложению на вашем компьютере. И когда мы говорим о мониторинге системных логов, мы имеем в виду каталог /var/log/.
Если вы пропустили первые статьи этой серии, то можете ознакомиться с ними, чтобы узнать, что побудило нас ее начать.
Шаг 1. Проведите аудит вашей системы с помощью Lynis
Lynis, созданный CISOfy, представляет собой инструмент аудита безопасности для операционных систем на базе Linux и UNIX. Он помогает пентестерам проводить проверку системы на соответствие такими стандартами безопасности и защиты информации, как ISO27001, HIPAA и PCI DSS. Хотя Lynis предназначен для компаний и организаций, его можно использовать для аудита обычных систем Ubuntu с высокой степенью надежности полученных данных.
Скачайте Lynis
Lynis доступен на GitHub и его легко можно скачать с помощью команды sudo wget ‘github.com/CISOfy/lynis/archive/master.zip’, как показано здесь:
sudo wget 'https://github.com/CISOfy/lynis/archive/master.zip'

---- https://github.com/CISOfy/lynis/archive/master.zip
Resolving github.com (github.com)... 192.30.253.112
Connecting to github.com (github.com)|192.30.253.112|:443... connected.
HTTP request sent, awaiting response... 302 Found
Location: https://codeload.github.com/CISOfy/lynis/zip/master [following]
---- https://codeload.github.com/CISOfy/lynis/zip/master
Resolving codeload.github.com (codeload.github.com)... 192.30.253.120
Connecting to codeload.github.com (codeload.github.com)|192.30.253.120|:443... connected.
HTTP request sent, awaiting response... 200 OK
Length: 345734 (338K) [application/zip]
Saving to: ‘master.zip’

master.zip                          100%[===================================================================>] 337.63K   237KB/s    in 1.4s

(237 KB/s) - ‘master.zip’ saved [345734/345734]
Мы используем sudo для последующих команд Lynis, поскольку для того, чтобы правильно все проверить, ему и его каталогам требуется привилегированный доступ к определенным областям операционной системы Ubuntu. Как правило, хранить таким образом исполняемые (бинарные) файлы и приложения небезопасно, но мы удалим Lynis сразу же после его использования.
Разархивируйте скачанный файл
Чтобы разархивировать скачанный ZIP-архив с Lynis используйте
sudo unzip master.zip

Archive:  master.zip
6e0ac57b68bfd39dd7d464e93ec85203ee683313
   creating: lynis-master/
 extracting: lynis-master/.gitignore
  inflating: lynis-master/.travis.yml
  inflating: lynis-master/CHANGELOG.md
  inflating: lynis-master/CODE_OF_CONDUCT.md
  inflating: lynis-master/CONTRIBUTING.md
  inflating: lynis-master/CONTRIBUTORS.md
  inflating: lynis-master/FAQ
  inflating: lynis-master/INSTALL
  inflating: lynis-master/LICENSE
  inflating: lynis-master/README
  inflating: lynis-master/README.md
   creating: lynis-master/db/
  inflating: lynis-master/db/fileperms.db
  inflating: lynis-master/db/hints.db
 extracting: lynis-master/db/integrity.db
   creating: lynis-master/db/languages/
  inflating: lynis-master/db/languages/az
    linking: lynis-master/db/languages/br  -> pt
  inflating: lynis-master/db/languages/cn
  inflating: lynis-master/db/languages/de
  inflating: lynis-master/db/languages/en
    linking: lynis-master/db/languages/en-GB  -> en
    linking: lynis-master/db/languages/en-US  -> en
  inflating: lynis-master/db/languages/es
  inflating: lynis-master/db/languages/fi
  inflating: lynis-master/db/languages/fr
  inflating: lynis-master/db/languages/gr
  inflating: lynis-master/db/languages/he
  inflating: lynis-master/db/languages/hu
  inflating: lynis-master/db/languages/it
  inflating: lynis-master/db/languages/ja
  inflating: lynis-master/db/languages/nb-NO
  inflating: lynis-master/db/languages/nl
    linking: lynis-master/db/languages/nl-BE  -> nl
    linking: lynis-master/db/languages/nl-NL  -> nl
  inflating: lynis-master/db/languages/pl
  inflating: lynis-master/db/languages/pt
  inflating: lynis-master/db/languages/ru
  inflating: lynis-master/db/languages/se
  inflating: lynis-master/db/languages/tr
  inflating: lynis-master/db/malware-susp.db
  inflating: lynis-master/db/malware.db
 extracting: lynis-master/db/sbl.db
  inflating: lynis-master/db/tests.db
  inflating: lynis-master/default.prf
  inflating: lynis-master/developer.prf
   creating: lynis-master/extras/
  inflating: lynis-master/extras/README
   creating: lynis-master/extras/bash_completion.d/
  inflating: lynis-master/extras/bash_completion.d/lynis
  inflating: lynis-master/extras/build-lynis.sh
  inflating: lynis-master/extras/check-lynis.sh
  inflating: lynis-master/extras/files.dat
  inflating: lynis-master/extras/lynis.spec
   creating: lynis-master/extras/openbsd/
  inflating: lynis-master/extras/openbsd/+CONTENTS
   creating: lynis-master/extras/systemd/
  inflating: lynis-master/extras/systemd/lynis.service
  inflating: lynis-master/extras/systemd/lynis.timer
   creating: lynis-master/extras/travis-ci/
 extracting: lynis-master/extras/travis-ci/before_script.sh
   creating: lynis-master/include/
  inflating: lynis-master/include/binaries
  inflating: lynis-master/include/consts
  inflating: lynis-master/include/data_upload
  inflating: lynis-master/include/functions
  inflating: lynis-master/include/helper_audit_dockerfile
  inflating: lynis-master/include/helper_configure
  inflating: lynis-master/include/helper_show
  inflating: lynis-master/include/helper_system_remote_scan
  inflating: lynis-master/include/helper_update
  inflating: lynis-master/include/osdetection
  inflating: lynis-master/include/parameters
  inflating: lynis-master/include/profiles
  inflating: lynis-master/include/report
  inflating: lynis-master/include/tests_accounting
  inflating: lynis-master/include/tests_authentication
  inflating: lynis-master/include/tests_banners
  inflating: lynis-master/include/tests_boot_services
  inflating: lynis-master/include/tests_containers
  inflating: lynis-master/include/tests_crypto
  inflating: lynis-master/include/tests_custom.template
  inflating: lynis-master/include/tests_databases
  inflating: lynis-master/include/tests_dns
  inflating: lynis-master/include/tests_file_integrity
  inflating: lynis-master/include/tests_file_permissions
  inflating: lynis-master/include/tests_filesystems
  inflating: lynis-master/include/tests_firewalls
  inflating: lynis-master/include/tests_hardening
  inflating: lynis-master/include/tests_homedirs
  inflating: lynis-master/include/tests_insecure_services
  inflating: lynis-master/include/tests_kernel
  inflating: lynis-master/include/tests_kernel_hardening
  inflating: lynis-master/include/tests_ldap
  inflating: lynis-master/include/tests_logging
  inflating: lynis-master/include/tests_mac_frameworks
  inflating: lynis-master/include/tests_mail_messaging
  inflating: lynis-master/include/tests_malware
  inflating: lynis-master/include/tests_memory_processes
  inflating: lynis-master/include/tests_nameservices
  inflating: lynis-master/include/tests_networking
  inflating: lynis-master/include/tests_php
  inflating: lynis-master/include/tests_ports_packages
  inflating: lynis-master/include/tests_printers_spools
  inflating: lynis-master/include/tests_scheduling
  inflating: lynis-master/include/tests_shells
  inflating: lynis-master/include/tests_snmp
  inflating: lynis-master/include/tests_squid
  inflating: lynis-master/include/tests_ssh
  inflating: lynis-master/include/tests_storage
  inflating: lynis-master/include/tests_storage_nfs
  inflating: lynis-master/include/tests_system_integrity
  inflating: lynis-master/include/tests_time
  inflating: lynis-master/include/tests_tooling
  inflating: lynis-master/include/tests_usb
  inflating: lynis-master/include/tests_virtualization
  inflating: lynis-master/include/tests_webservers
  inflating: lynis-master/include/tool_tips
  inflating: lynis-master/lynis
  inflating: lynis-master/lynis.8
   creating: lynis-master/plugins/
  inflating: lynis-master/plugins/README
  inflating: lynis-master/plugins/custom_plugin.template
  inflating: lynis-master/plugins/plugin_pam_phase1
  inflating: lynis-master/plugins/plugin_systemd_phase1
finishing deferred symbolic links:
  lynis-master/db/languages/br -> pt
  lynis-master/db/languages/en-GB -> en
  lynis-master/db/languages/en-US -> en
  lynis-master/db/languages/nl-BE -> nl
  lynis-master/db/languages/nl-NL -> nl
Затем перейдите с помощью команды cd в только что созданный каталог lynis-master/:
cd lynis-master
Бинарный файл Lynis должен иметь разрешение на исполнение на вашем компьютере, но в случае, если этих прав у него нет, используйте команду sudo chmod +x lynis.
sudo chmod +x lynis
Запустите Lynis
Чтобы проверить, установился ли Lynis, а заодно просмотреть его доступные параметры, используйте команду help (-h), то есть
sudo ./lynis -h

[ Lynis 2.6.5 ]

################################################################################
  Lynis comes with ABSOLUTELY NO WARRANTY. This is free software, and you are
  welcome to redistribute it under the terms of the GNU General Public License.
  See the LICENSE file for details about using this software.

  2007-2018, CISOfy - https://cisofy.com/lynis/
  Enterprise support available (compliance, plugins, interface and tools)
################################################################################

[+] Initializing program
------------------------------------

  Usage: lynis command [options]

  Command:

    audit
        audit system                  : Perform local security scan
        audit system remote <host>    : Remote security scan
        audit dockerfile <file>       : Analyze Dockerfile

    show
        show                          : Show all commands
        show version                  : Show Lynis version
        show help                     : Show help

    update
        update info                   : Show update details

  Options:

    --no-log                          : Don't create a log file
    --pentest                         : Non-privileged scan (useful for pentest)
    --profile <profile>               : Scan the system with the given profile file
    --quick (-Q)                      : Quick mode, don't wait for user input

    Layout options
    --no-colors                       : Don't use colors in output
    --quiet (-q)                      : No output
    --reverse-colors                  : Optimize color display for light backgrounds

    Misc options
    --debug                           : Debug logging to screen
    --view-manpage (--man)            : View man page
    --verbose                         : Show more details on screen
    --version (-V)                    : Display version number and quit

    Enterprise options
    --plugindir <path>                : Define path of available plugins
    --upload                          : Upload data to central node

    More options available. Run './lynis show options', or use the man page.
Чтобы начать аудит операционной системы, используйте вот эту команду:
sudo ./lynis audit system

[ Lynis 2.6.5 ]

[+] Initializing program
------------------------------------
  - Detecting OS...                                           [ DONE ]
  - Checking profiles...                                      [ DONE ]

  ---------------------------------------------------
  Program version:           2.6.5
  Operating system:          Linux
  Operating system name:     Ubuntu Linux
  Operating system version:  18.04
  Kernel version:            4.15.0
  Hardware platform:         x86_64
  Hostname:                  nullbyte
  ---------------------------------------------------
  Profiles:                  /home/tokyoneon/Desktop/lynis-master/default.prf
  Log file:                  /var/log/lynis.log
  Report file:               /var/log/lynis-report.dat
  Report version:            1.0
  Plugin directory:          ./plugins
  ---------------------------------------------------
  Auditor:                   [Not Specified]
  Language:                  en
  Test category:             all
  Test group:                all
  ---------------------------------------------------
  - Program update status...                                  [ UNKNOWN ]

================================================================================

  -[ Lynis 2.6.5 Results ]-

  Great, no warnings

  Suggestions (25):
  ----------------------------
  * Set a password on GRUB bootloader to prevent altering boot configuration (e.g. boot in single user mode without password) [BOOT-5122]
      https://cisofy.com/controls/BOOT-5122/

  * Install a PAM module for password strength testing like pam_cracklib or pam_passwdqc [AUTH-9262]
      https://cisofy.com/controls/AUTH-9262/

  * Configure minimum password age in /etc/login.defs [AUTH-9286]
      https://cisofy.com/controls/AUTH-9286/

  * Configure maximum password age in /etc/login.defs [AUTH-9286]
      https://cisofy.com/controls/AUTH-9286/

  * Default umask in /etc/login.defs could be more strict like 027 [AUTH-9328]
      https://cisofy.com/controls/AUTH-9328/

  * To decrease the impact of a full /home file system, place /home on a separated partition [FILE-6310]
      https://cisofy.com/controls/FILE-6310/

  * To decrease the impact of a full /tmp file system, place /tmp on a separated partition [FILE-6310]
      https://cisofy.com/controls/FILE-6310/

  * To decrease the impact of a full /var file system, place /var on a separated partition [FILE-6310]
      https://cisofy.com/controls/FILE-6310/

  * Disable drivers like USB storage when not used, to prevent unauthorized storage or data theft [STRG-1840]
      https://cisofy.com/controls/STRG-1840/

  * Check DNS configuration for the dns domain name [NAME-4028]
      https://cisofy.com/controls/NAME-4028/

  * Install debsums utility for the verification of packages with known good database. [PKGS-7370]
      https://cisofy.com/controls/PKGS-7370/

  * Install package apt-show-versions for patch management purposes [PKGS-7394]
      https://cisofy.com/controls/PKGS-7394/

  * Consider running ARP monitoring software (arpwatch,arpon) [NETW-3032]
      https://cisofy.com/controls/NETW-3032/

  * Check iptables rules to see which rules are currently not used [FIRE-4513]
      https://cisofy.com/controls/FIRE-4513/

  * Check what deleted files are still in use and why. [LOGG-2190]
      https://cisofy.com/controls/LOGG-2190/

  * Add a legal banner to /etc/issue, to warn unauthorized users [BANN-7126]
      https://cisofy.com/controls/BANN-7126/

  * Add legal banner to /etc/issue.net, to warn unauthorized users [BANN-7130]
      https://cisofy.com/controls/BANN-7130/

  * Enable process accounting [ACCT-9622]
      https://cisofy.com/controls/ACCT-9622/

  * Enable sysstat to collect accounting (no results) [ACCT-9626]
      https://cisofy.com/controls/ACCT-9626/

  * Enable auditd to collect audit information [ACCT-9628]
      https://cisofy.com/controls/ACCT-9628/

  * Install a file integrity tool to monitor changes to critical and sensitive files [FINT-4350]
      https://cisofy.com/controls/FINT-4350/

  * Determine if automation tools are present for system management [TOOL-5002]
      https://cisofy.com/controls/TOOL-5002/

  * One or more sysctl values differ from the scan profile and could be tweaked [KRNL-6000]
    - Solution : Change sysctl value or disable test (skip-test=KRNL-6000:<sysctl-key>)
      https://cisofy.com/controls/KRNL-6000/

  * Harden compilers like restricting access to root user only [HRDN-7222]
      https://cisofy.com/controls/HRDN-7222/

  * Harden the system by installing at least one malware scanner, to perform periodic file system scans [HRDN-7230]
    - Solution : Install a tool like rkhunter, chkrootkit, OSSEC
      https://cisofy.com/controls/HRDN-7230/

================================================================================

  Lynis security scan details:

  Hardening index : 67 [#############       ]
  Tests performed : 223
  Plugins enabled : 2

  Components:
  - Firewall               [V]
  - Malware scanner        [X]

  Lynis Modules:
  - Compliance Status      [?]
  - Security Audit         [V]
  - Vulnerability Scan     [V]

  Files:
  - Test and debug information      : /var/log/lynis.log
  - Report data                     : /var/log/lynis-report.dat

================================================================================
Lynis выполняет более 200 тестов, и его результаты, которые он выводит в консоль, представляют собой довольно большой блок информации. Мы пропустили большую часть его лога, но оставили раздел Suggestions («Предложения»). Мы считаем, что это одна из самых сильных сторон Lynis. Он предлагает несколько полезных отправных точек для тех пользователей, кто заинтересован в укреплении безопасности своей системы. Например, Lynis рекомендует «Усилить безопасность системы, установив хотя бы один сканнер вредоносного ПО». Эту рекомендацию довольно легко можно выполнить на следующем шаге нашей статьи, установив антивирусное программное обеспечение.
Удалите Lynis после завершения
Когда вы полностью проведете аудит Ubuntu, вы можете удалить Lynis, используя приведенные ниже команды rm.
sudo rm -rf /path/to/lynis-master/
sudo rm -rf /path/to/master.zip
Шаг 2. Защититесь от вредоносного ПО с помощью ClamAV
ClamAV — это опенсорсная антивирусная система, которую можно использовать в различных ситуациях, включая сканирование электронной почты, веб-сканирование и т.п. Она предлагает ряд функций, которые пользователи Ubuntu оценят по достоинству:
- Сканер для командной строки. Он позволит пользователям быстро сканировать файлы, скаченные из Интернета, из любого окна терминала.
- Обновление базы данных. Вирусная база ClamAV будет обновляться несколько раз в день с помощью скриптов обновлений и цифровых подписей.
- Поддержка многих форматов архивов. Сканер ClamAV способен безопасно анализировать Zip, RAR, Dmg, Tar, Gzip, Bzip2, OLE2, Cabinet, CHM, BinHex, SIS и другие форматы файлов.
- Поддержка популярных форматов документов. MS Office, MacOffice, HTML, Flash, RTF и PDF.
В отличие от Avast, популярной антивирусной компании, которая регулярно отсылает личные пользовательские документы на серверы Avast, ClamAV сканирует файловые системы по сигнатурам вредоносных программ локально. Это действительно все, что он делает. Он не обеспечивает пуленепробиваемую защиту от высокотехнологичных атак, но дает защиту от обычных вредоносов, которых можно подцепить на просторах Интернета.
Считается, что операционным системам Linux не требуется антивирусное программное обеспечение. В основном мы согласны с этим утверждением. Однако ClamAV является отличным опенсорсным проектом, обеспечивающим спокойствие и комфорт тем пользователям, которые предпочитают знать наверняка, что их ОС находится в безопасности и что ее сканируют на наличие вредоносных программ несколько раз в день.
Установка ClamAV
ClamAV доступен в репозиториях Ubuntu и может быть установлен с помощью команды sudo apt-get install clamav.
sudo apt-get install clamav

Reading package lists... Done
Building dependency tree
Reading state information... Done
The following package was automatically installed and is no longer required:
  menu
Use 'sudo apt autoremove' to remove it.
The following additional packages will be installed:
  clamav-base clamav-freshclam libclamav7 libllvm3.9 libmspack0 libtfm1
Suggested packages:
  clamav-docs libclamunrar7
The following NEW packages will be installed:
  clamav clamav-base clamav-freshclam libclamav7 libllvm3.9 libmspack0 libtfm1
0 upgraded, 7 newly installed, 0 to remove and 0 not upgraded.
Need to get 12.5 MB of archives.
After this operation, 50.3 MB of additional disk space will be used.
Do you want to continue? [Y/n] y
Сканирование каталогов с помощью ClamAV
Базы данных ClamAV сразу обновятся, как только он будет установлен в систему. В течение дня эта процедура может выполняться еще несколько раз. Команду clamscan —help можно использовать для того, чтобы просмотреть доступные варианты сканирования.
clamscan --help

                       Clam AntiVirus Scanner 0.99.4
           By The ClamAV Team: http://www.clamav.net/about.html#credits
           (C) 2007-2018 Cisco Systems, Inc.

    --help                -h             Print this help screen
    --version             -V             Print version number
    --verbose             -v             Be verbose
    --archive-verbose     -a             Show filenames inside scanned archives
    --debug                              Enable libclamav's debug messages
    --quiet                              Only output error messages
    --stdout                             Write to stdout instead of stderr
    --no-summary                         Disable summary at end of scanning
    --infected            -i             Only print infected files
    --suppress-ok-results -o             Skip printing OK files
    --bell                               Sound bell on virus detection

    --tempdir=DIRECTORY                  Create temporary files in DIRECTORY
    --leave-temps[=yes/no(*)]            Do not remove temporary files
    --database=FILE/DIR   -d FILE/DIR    Load virus database from FILE or load
                                         all supported db files from DIR
    --official-db-only[=yes/no(*)]       Only load official signatures
    --log=FILE            -l FILE        Save scan report to FILE
    --recursive[=yes/no(*)]  -r          Scan subdirectories recursively
    --allmatch[=yes/no(*)]   -z          Continue scanning within file after finding a match
    --cross-fs[=yes(*)/no]               Scan files and directories on other filesystems
    --follow-dir-symlinks[=0/1(*)/2]     Follow directory symlinks (0 = never, 1 = direct, 2 = always)
    --follow-file-symlinks[=0/1(*)/2]    Follow file symlinks (0 = never, 1 = direct, 2 = always)
    --file-list=FILE      -f FILE        Scan files from FILE
    --remove[=yes/no(*)]                 Remove infected files. Be careful!
    --move=DIRECTORY                     Move infected files into DIRECTORY
    --copy=DIRECTORY                     Copy infected files into DIRECTORY
    --exclude=REGEX                      Don't scan file names matching REGEX
    --exclude-dir=REGEX                  Don't scan directories matching REGEX
    --include=REGEX                      Only scan file names matching REGEX
    --include-dir=REGEX                  Only scan directories matching REGEX

    --bytecode[=yes(*)/no]               Load bytecode from the database
    --bytecode-unsigned[=yes/no(*)]      Load unsigned bytecode
    --bytecode-timeout=N                 Set bytecode timeout (in milliseconds)
    --statistics[=none(*)/bytecode/pcre] Collect and print execution statistics
    --detect-pua[=yes/no(*)]             Detect Possibly Unwanted Applications
    --exclude-pua=CAT                    Skip PUA sigs of category CAT
    --include-pua=CAT                    Load PUA sigs of category CAT
    --detect-structured[=yes/no(*)]      Detect structured data (SSN, Credit Card)
    --structured-ssn-format=X            SSN format (0=normal,1=stripped,2=both)
    --structured-ssn-count=N             Min SSN count to generate a detect
    --structured-cc-count=N              Min CC count to generate a detect
    --scan-mail[=yes(*)/no]              Scan mail files
    --phishing-sigs[=yes(*)/no]          Signature-based phishing detection
    --phishing-scan-urls[=yes(*)/no]     URL-based phishing detection
    --heuristic-scan-precedence[=yes/no(*)] Stop scanning as soon as a heuristic match is found
    --phishing-ssl[=yes/no(*)]           Always block SSL mismatches in URLs (phishing module)
    --phishing-cloak[=yes/no(*)]         Always block cloaked URLs (phishing module)
    --partition-intersection[=yes/no(*)] Detect partition intersections in raw disk images using heuristics.
    --algorithmic-detection[=yes(*)/no]  Algorithmic detection
    --scan-pe[=yes(*)/no]                Scan PE files
    --scan-elf[=yes(*)/no]               Scan ELF files
    --scan-ole2[=yes(*)/no]              Scan OLE2 containers
    --scan-pdf[=yes(*)/no]               Scan PDF files
    --scan-swf[=yes(*)/no]               Scan SWF files
    --scan-html[=yes(*)/no]              Scan HTML files
    --scan-xmldocs[=yes(*)/no]           Scan xml-based document files
    --scan-hwp3[=yes(*)/no]              Scan HWP3 files
    --scan-archive[=yes(*)/no]           Scan archive files (supported by libclamav)
    --detect-broken[=yes/no(*)]          Try to detect broken executable files
    --block-encrypted[=yes/no(*)]        Block encrypted archives
    --block-macros[=yes/no(*)]           Block OLE2 files with VBA macros
    --nocerts                            Disable authenticode certificate chain verification in PE files
    --dumpcerts                          Dump authenticode certificate chain in PE files

    --max-filesize=#n                    Files larger than this will be skipped and assumed clean
    --max-scansize=#n                    The maximum amount of data to scan for each container file (**)
    --max-files=#n                       The maximum number of files to scan for each container file (**)
    --max-recursion=#n                   Maximum archive recursion level for container file (**)
    --max-dir-recursion=#n               Maximum directory recursion level
    --max-embeddedpe=#n                  Maximum size file to check for embedded PE
    --max-htmlnormalize=#n               Maximum size of HTML file to normalize
    --max-htmlnotags=#n                  Maximum size of normalized HTML file to scan
    --max-scriptnormalize=#n             Maximum size of script file to normalize
    --max-ziptypercg=#n                  Maximum size zip to type reanalyze
    --max-partitions=#n                  Maximum number of partitions in disk image to be scanned
    --max-iconspe=#n                     Maximum number of icons in PE file to be scanned
    --max-rechwp3=#n                     Maximum recursive calls to HWP3 parsing function
    --pcre-match-limit=#n                Maximum calls to the PCRE match function.
    --pcre-recmatch-limit=#n             Maximum recursive calls to the PCRE match function.
    --pcre-max-filesize=#n               Maximum size file to perform PCRE subsig matching.
    --enable-stats                       Enable statistical reporting of malware
    --disable-pe-stats                   Disable submission of individual PE sections in stats submissions
    --stats-timeout=#n                   Number of seconds to wait for waiting a response back from the stats server
    --stats-host-id=UUID                 Set the Host ID used when submitting statistical info.
    --disable-cache                      Disable caching and cache checks for hash sums of scanned files.
Для сканирования каждого файла и каталога используйте следующую команду:
sudo clamscan -r / --log=/tmp/clamav_report.log
Это команда сканера в простейшей форме. Clamscan будет рекурсивно (-r) проверять все (/) и сохранит отчет о проверке (-log) в каталоге /tmp. Выполнение такого сканирования может занять значительное время, если вам придется сканировать терабайты данных. Рекомендуется проводить такие сканы на ночь и просматривать результаты утром.
Обнаружение вредоносных программ
В качестве быстрой демонстрации для этой статьи мы скачали вредоносный репозиторий из GitHub и запустили clamscan на сканирование его каталога.
sudo clamscan -ir malware-master/

malware-master/Zeus/output/builder/bot.exe.txt: Win.Spyware.Zbot-1275 FOUND
malware-master/Zeus/output/builder/zsb.exe: Win.Trojan.Zbot-62846 FOUND
malware-master/Zeus/output/server/zsbcs.exe: Win.Trojan.Botnet-6 FOUND
malware-master/Zeus/output/client32.bin: Win.Spyware.Zbot-1275 FOUND
malware-master/Alina/Panel/gate1.php: Php.Malware.ProPOS-2 FOUND
malware-master/mirai/loader/bins/dlr.mpsl: Unix.Malware.Agent-1753181 FOUND
malware-master/mirai/loader/bins/dlr.spc: Unix.Malware.Agent-1753190 FOUND
malware-master/mirai/loader/bins/dlr.arm7: Unix.Malware.Agent-1753196 FOUND
malware-master/mirai/loader/bins/dlr.x86: Unix.Malware.Agent-1753191 FOUND
malware-master/mirai/loader/bins/dlr.sh4: Unix.Malware.Agent-1753186 FOUND
malware-master/mirai/loader/bins/dlr.ppc: Unix.Malware.Agent-1753179 FOUND
malware-master/mirai/loader/bins/dlr.arm: Unix.Malware.Agent-1768364 FOUND
malware-master/mirai/loader/bins/dlr.m68k: Unix.Malware.Agent-1753197 FOUND
malware-master/mirai/loader/bins/dlr.mips: Unix.Malware.Agent-1753182 FOUND
malware-master/mirai/dlr/release/dlr.mpsl: Unix.Malware.Agent-1753187 FOUND
malware-master/mirai/dlr/release/dlr.spc: Unix.Malware.Agent-1753199 FOUND
malware-master/mirai/dlr/release/dlr.arm7: Unix.Malware.Agent-1753512 FOUND
malware-master/mirai/dlr/release/dlr.sh4: Unix.Malware.Agent-1753174 FOUND
malware-master/mirai/dlr/release/dlr.ppc: Unix.Malware.Agent-1753492 FOUND
malware-master/mirai/dlr/release/dlr.arm: Unix.Malware.Agent-1753516 FOUND
malware-master/mirai/dlr/release/dlr.m68k: Unix.Malware.Agent-1753177 FOUND
malware-master/mirai/dlr/release/dlr.mips: Unix.Malware.Agent-1753194 FOUND
malware-master/Grum/builder+bin/out.exe: Win.Trojan.Vilsel-2129 FOUND

----------- SCAN SUMMARY -----------
Known viruses: 6556187
Engine version: 0.99.4
Scanned directories: 1594
Scanned files: 17195
Infected files: 23
Data scanned: 366.88 MB
Data read: 294.26 MB (ratio 1.25:1)
Time: 71.994 sec (1 m 11 s)
В нашу команду мы включили аргумент -i, который сообщает clamscan выводить информацию о сканировании только в случае обнаружения инфицированных файлов. Мы можем видеть, что было проверено 17 195 файлов, обнаружено 23 зараженных и для завершения этого процесса потребовалась 71 секунда.
Для получения дополнительной информации о ClamAV ознакомьтесь с его официальной документацией.
Шаг 3. Мониторьте доступ к Интернету с помощью OpenSnitch
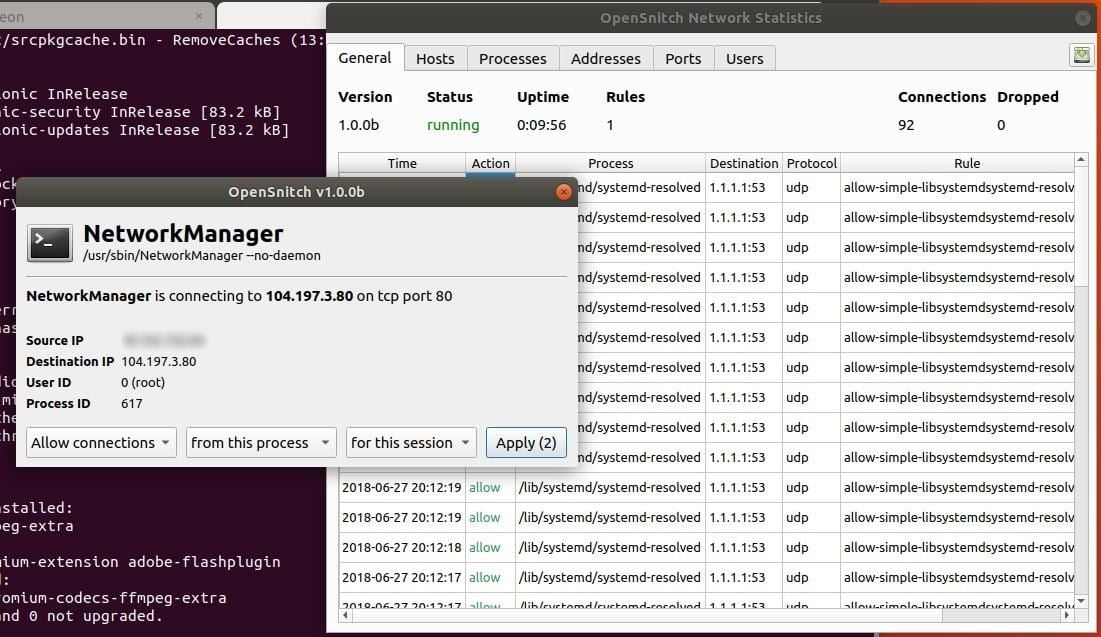
OpenSnitch — это портированный на Linux популярный брандмауэр macOS — Little Snitch. OpenSnitch дает пользователям несколько секунд на то, чтобы разрешить или запретить соединение по мере их возникновения. Ниже приведен пример такого запроса от OpenSnitch.
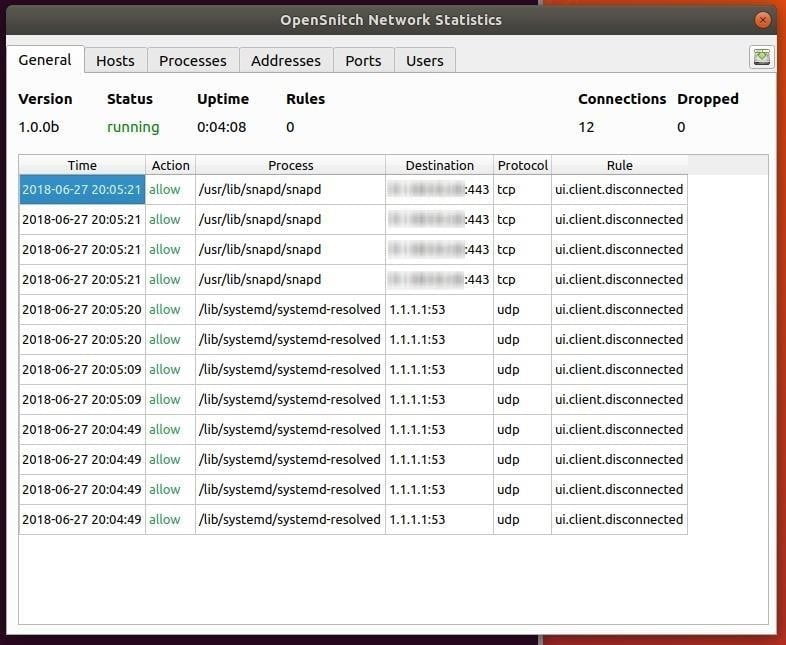
Интерфейс сетевой статистики OpenSnitch предоставляет обзор всех ранее разрешенных и запрещенных соединений.
К сожалению, это все, что может предложить этот интерфейс на данный момент. Более поздние выпуски OpenSnitch, без сомнения, будут содержать больше возможностей и давать больше контроля над тем, как управляться с этой информацией. Хотя OpenSnitch находится все еще в очень зачаточном состоянии, мы решили все-таки включить его в эту статью. Пользователи Windows 10, которым более комфортно обращаться с графическими приложениями (GUI), могут найти OpenSnitch весьма полезным инструментом для мониторинга трафика, исходящего от установленных приложений.
Фанаты командной строки, заинтересованные в необработанном анализе нефильтрованных пакетов, могут использовать Tshark для отслеживания трафика.
Установите зависимости
Для установки зависимостей OpenSnitch используйте команду ниже:
sudo apt-get install protobuf-compiler libpcap-dev libnetfilter-queue-dev python3-pip golang git go-dep

Reading package lists... Done
Building dependency tree
Reading state information... Done
The following additional packages will be installed:
  dh-python golang-1.10 golang-1.10-doc golang-1.10-go golang-1.10-race-detector-runtime golang-1.10-src golang-doc golang-go
  golang-race-detector-runtime golang-src libexpat1-dev libnetfilter-queue1 libnfnetlink-dev libpcap0.8-dev libprotoc10 libpython3-dev
  libpython3.6-dev pkg-config python-pip-whl python3-dev python3-distutils python3-lib2to3 python3-setuptools python3-wheel python3.6-dev
Suggested packages:
  bzr git mercurial subversion python-setuptools-doc
The following NEW packages will be installed:
  dh-python golang golang-1.10 golang-1.10-doc golang-1.10-go golang-1.10-race-detector-runtime golang-1.10-src golang-doc golang-go
  golang-race-detector-runtime golang-src libexpat1-dev libnetfilter-queue-dev libnetfilter-queue1 libnfnetlink-dev libpcap-dev libpcap0.8-dev
  libprotoc10 libpython3-dev libpython3.6-dev pkg-config protobuf-compiler python-pip-whl python3-dev python3-distutils python3-lib2to3 python3-pip
  python3-setuptools python3-wheel python3.6-dev
0 upgraded, 30 newly installed, 0 to remove and 0 not upgraded.
Need to get 52.1 MB of archives.
After this operation, 280 MB of additional disk space will be used.
Do you want to continue? [Y/n] y
Используйте команду go, чтобы клонировать репозиторий протокольных буферов. Эта команда ничего не выдаст в терминал.
go get github.com/golang/protobuf/protoc-gen-go
Затем используйте pip для того, чтобы установить gRPC-tools и другие зависимости.
python3 -m pip install --user grpcio-tools

Collecting grpcio-tools
  Downloading https://files.pythonhosted.org/packages/fb/8f/fc0c7cf8a5ed2aea405afb8712ea4181bbcf9510d731b7cd929427916f97/grpcio_tools-1.12.1-cp36-cp36m-manylinux1_x86_64.whl (22.2MB)
    100% |████████████████████████████████| 22.2MB 53kB/s
Collecting grpcio>=1.12.1 (from grpcio-tools)
  Downloading https://files.pythonhosted.org/packages/1f/ea/664c589ec41b9e9ac6e20cc1fe9016f3913332d0dc5498a5d7771e2835af/grpcio-1.12.1-cp36-cp36m-manylinux1_x86_64.whl (9.0MB)
    100% |████████████████████████████████| 9.0MB 133kB/s
Collecting protobuf>=3.5.0.post1 (from grpcio-tools)
  Downloading https://files.pythonhosted.org/packages/fc/f0/db040681187496d10ac50ad167a8fd5f953d115b16a7085e19193a6abfd2/protobuf-3.6.0-cp36-cp36m-manylinux1_x86_64.whl (7.1MB)
    100% |████████████████████████████████| 7.1MB 136kB/s
Collecting six>=1.5.2 (from grpcio>=1.12.1->grpcio-tools)
  Downloading https://files.pythonhosted.org/packages/67/4b/141a581104b1f6397bfa78ac9d43d8ad29a7ca43ea90a2d863fe3056e86a/six-1.11.0-py2.py3-none-any.whl
Collecting setuptools (from protobuf>=3.5.0.post1->grpcio-tools)
  Downloading https://files.pythonhosted.org/packages/7f/e1/820d941153923aac1d49d7fc37e17b6e73bfbd2904959fffbad77900cf92/setuptools-39.2.0-py2.py3-none-any.whl (567kB)
    100% |████████████████████████████████| 573kB 419kB/s
Installing collected packages: six, grpcio, setuptools, protobuf, grpcio-tools
Successfully installed grpcio-1.12.1 grpcio-tools-1.12.1 protobuf-3.6.0 setuptools-39.2.0 six-1.11.0
Используйте go github.com/evilsocket/opensnitch для клонирования репозитория OpenSnitch с GitHub.
go get github.com/evilsocket/opensnitch

package github.com/evilsocket/opensnitch: no Go files in /home/tokyoneon/go/src/github.com/evilsocket/opensnitch
Обновите PATH для языка Golang, используя команду ниже. Это позволит будущим консольным сеансам знать, где хранятся исходные файлы и проекты Go.
echo 'export GOPATH=$HOME/go' >> ~/.bashrc
Затем используйте команду source, чтобы обновить переменную PATH. Это позволит правильно выполнить предыдущие команды.
source ~/.bashrc
Настройка и установка OpenSnitch
Нужно воспользоваться make, утилитой, которая автоматически определит, какие части OpenSnitch необходимо перекомпилировать.
make

make[1]: Entering directory '/home/tokyoneon/go/src/github.com/evilsocket/opensnitch/proto'
python3 -m grpc_tools.protoc -I. --python_out=../ui/opensnitch/ --grpc_python_out=../ui/opensnitch/ ui.proto
make[1]: Leaving directory '/home/tokyoneon/go/src/github.com/evilsocket/opensnitch/proto'
make[1]: Entering directory '/home/tokyoneon/go/src/github.com/evilsocket/opensnitch/daemon'
dep: WARNING: Unknown field in manifest: prune
make[1]: Leaving directory '/home/tokyoneon/go/src/github.com/evilsocket/opensnitch/daemon'
make[1]: Entering directory '/home/tokyoneon/go/src/github.com/evilsocket/opensnitch/ui'
The directory '/home/tokyoneon/.cache/pip/http' or its parent directory is not owned by the current user and the cache has been disabled. Please check the permissions and owner of that directory. If executing pip with sudo, you may want sudo's -H flag.
The directory '/home/tokyoneon/.cache/pip' or its parent directory is not owned by the current user and caching wheels has been disabled. check the permissions and owner of that directory. If executing pip with sudo, you may want sudo's -H flag.
Collecting grpcio==1.0.0 (from -r requirements.txt (line 1))
  Downloading https://files.pythonhosted.org/packages/ba/f7/2138b9148b2d68431ebb05d4871e2fc60deacb4ee282384171083b522823/grpcio-1.0.0.tar.gz (5.3MB)
    100% |████████████████████████████████| 5.3MB 181kB/s
Collecting grpcio-tools==1.10.1 (from -r requirements.txt (line 2))
  Downloading https://files.pythonhosted.org/packages/f0/f4/1e5a56b1c0ec2d802113c7f793fcb40ba4e9387b073c310e27ef8653b441/grpcio_tools-1.10.1-cp36-cp36m-manylinux1_x86_64.whl (22.2MB)
    100% |████████████████████████████████| 22.2MB 55kB/s
Collecting pyinotify==0.9.6 (from -r requirements.txt (line 3))
  Downloading https://files.pythonhosted.org/packages/e3/c0/fd5b18dde17c1249658521f69598f3252f11d9d7a980c5be8619970646e1/pyinotify-0.9.6.tar.gz (60kB)
    100% |████████████████████████████████| 61kB 81kB/s
Collecting unicode_slugify==0.1.3 (from -r requirements.txt (line 4))
  Downloading https://files.pythonhosted.org/packages/8c/ba/1a05f61c7fd72df85ae4dc1c7967a3e5a4b6c61f016e794bc7f09b2597c0/unicode-slugify-0.1.3.tar.gz
Collecting pyqt5==5.10.1 (from -r requirements.txt (line 5))
  Downloading https://files.pythonhosted.org/packages/e4/15/4e2e49f64884edbab6f833c6fd3add24d7938f2429aec1f2883e645d4d8f/PyQt5-5.10.1-5.10.1-cp35.cp36.cp37.cp38-abi3-manylinux1_x86_64.whl (107.8MB)
    100% |████████████████████████████████| 107.8MB 13kB/s
Collecting configparser==3.5.0 (from -r requirements.txt (line 6))
  Downloading https://files.pythonhosted.org/packages/7c/69/c2ce7e91c89dc073eb1aa74c0621c3eefbffe8216b3f9af9d3885265c01c/configparser-3.5.0.tar.gz
Requirement already satisfied: six>=1.5.2 in /home/tokyoneon/.local/lib/python3.6/site-packages (from grpcio==1.0.0->-r requirements.txt (line 1))
Collecting enum34>=1.0.4 (from grpcio==1.0.0->-r requirements.txt (line 1))
  Downloading https://files.pythonhosted.org/packages/af/42/cb9355df32c69b553e72a2e28daee25d1611d2c0d9c272aa1d34204205b2/enum34-1.1.6-py3-none-any.whl
Collecting futures>=2.2.0 (from grpcio==1.0.0->-r requirements.txt (line 1))
  Downloading https://files.pythonhosted.org/packages/cc/26/b61e3a4eb50653e8a7339d84eeaa46d1e93b92951978873c220ae64d0733/futures-3.1.1.tar.gz
Requirement already satisfied: protobuf>=3.0.0 in /home/tokyoneon/.local/lib/python3.6/site-packages (from grpcio==1.0.0->-r requirements.txt (line 1))
Collecting unidecode (from unicode_slugify==0.1.3->-r requirements.txt (line 4))
  Downloading https://files.pythonhosted.org/packages/59/ef/67085e30e8bbcdd76e2f0a4ad8151c13a2c5bce77c85f8cad6e1f16fb141/Unidecode-1.0.22-py2.py3-none-any.whl (235kB)
    100% |████████████████████████████████| 235kB 142kB/s
Collecting sip<4.20,>=4.19.4 (from pyqt5==5.10.1->-r requirements.txt (line 5))
  Downloading https://files.pythonhosted.org/packages/8a/ea/d317ce5696dda4df7c156cd60447cda22833b38106c98250eae1451f03ec/sip-4.19.8-cp36-cp36m-manylinux1_x86_64.whl (66kB)
    100% |████████████████████████████████| 71kB 80kB/s
Requirement already satisfied: setuptools in /home/tokyoneon/.local/lib/python3.6/site-packages (from protobuf>=3.0.0->grpcio==1.0.0->-r requirements.txt (line 1))
Installing collected packages: enum34, futures, grpcio, grpcio-tools, pyinotify, unidecode, unicode-slugify, sip, pyqt5, configparser
  Running setup.py install for futures ... done
  Found existing installation: grpcio 1.12.1
    Uninstalling grpcio-1.12.1:
      Successfully uninstalled grpcio-1.12.1
  Running setup.py install for grpcio ... done
  Found existing installation: grpcio-tools 1.12.1
    Uninstalling grpcio-tools-1.12.1:
      Successfully uninstalled grpcio-tools-1.12.1
  Running setup.py install for pyinotify ... done
  Running setup.py install for unicode-slugify ... done
  Running setup.py install for configparser ... done
Successfully installed configparser-3.5.0 enum34-1.1.6 futures-3.1.1 grpcio-1.0.0 grpcio-tools-1.10.1 pyinotify-0.9.6 pyqt5-5.10.1 sip-4.19.8 unicode-slugify-0.1.3 unidecode-1.0.22
make[1]: Leaving directory '/home/tokyoneon/go/src/github.com/evilsocket/opensnitch/ui'
Для завершения установки используйте команду make install с sudo.
sudo make install

make[1]: Entering directory '/home/tokyoneon/go/src/github.com/evilsocket/opensnitch/daemon'
make[1]: Leaving directory '/home/tokyoneon/go/src/github.com/evilsocket/opensnitch/daemon'
make[1]: Entering directory '/home/tokyoneon/go/src/github.com/evilsocket/opensnitch/ui'
The directory '/home/tokyoneon/.cache/pip/http' or its parent directory is not owned by the current user and the cache has been disabled. Please check the permissions and owner of that directory. If executing pip with sudo, you may want sudo's -H flag.
The directory '/home/tokyoneon/.cache/pip' or its parent directory is not owned by the current user and caching wheels has been disabled. check the permissions and owner of that directory. If executing pip with sudo, you may want sudo's -H flag.
Processing /home/tokyoneon/go/src/github.com/evilsocket/opensnitch/ui
Installing collected packages: opensnitch-ui
  Running setup.py install for opensnitch-ui ... done
Successfully installed opensnitch-ui-1.0.0b0
make[1]: Leaving directory '/home/tokyoneon/go/src/github.com/evilsocket/opensnitch/ui'
Запускайте OpenSnitch при загрузке
Чтобы запускать OpenSnitch при каждой загрузке ОС, используйте команду systemctl с аргументом enable.
sudo systemctl enable opensnitchd

Created symlink /etc/systemd/system/multi-user.target.wants/opensnitchd.service → /etc/systemd/system/opensnitchd.service.
Перезагрузите систему, чтобы изменения вступили в силу. OpenSnitch можно будет найти в панели со значками. Кликните по кнопке «Статистика», чтобы открыть пользовательский интерфейс.

Как только приложения попытаются получить доступ к Интернету, OpenSnitch выведет вам запрос на разрешение или на запрет этого действия.
Шаг 4. Регулярно мониторьте системные логи
Файлы журналов Linux хранятся в каталоге /var/log/. Эти файлы помогают отслеживать активность системы, фоновых демонов, сообщения ядра, логи приложений и серверов, логи проверки подлинности, логи брандмауэра, логи AppArmor и многие другие.
Для мониторинга журналов в реальном времени используйте команду:
find /var/log/ -type f \( -name "*.log" \) -exec tail -f "$file" {} +

==> /var/log/ufw.log <==
kernel: [ 3488.126537] [UFW BLOCK] IN= OUT=enp0s8 SRC=192.168.1.44 DST=52.84.13.246 LEN=60 TOS=0x00 PREC=0x00 TTL=64 ID=14998 DF PROTO=TCP SPT=51778 DPT=80 WINDOW=29200 RES=0x00 SYN URGP=0
kernel: [ 3489.152073] [UFW BLOCK] IN= OUT=enp0s8 SRC=192.168.1.44 DST=52.84.13.246 LEN=60 TOS=0x00 PREC=0x00 TTL=64 ID=14999 DF PROTO=TCP SPT=51778 DPT=80 WINDOW=29200 RES=0x00 SYN URGP=0
kernel: [ 3491.168057] [UFW BLOCK] IN= OUT=enp0s8 SRC=192.168.1.44 DST=52.84.13.246 LEN=60 TOS=0x00 PREC=0x00 TTL=64 ID=15000 DF PROTO=TCP SPT=51778 DPT=80 WINDOW=29200 RES=0x00 SYN URGP=0
kernel: [ 3495.392064] [UFW BLOCK] IN= OUT=enp0s8 SRC=192.168.1.44 DST=52.84.13.246 LEN=60 TOS=0x00 PREC=0x00 TTL=64 ID=15001 DF PROTO=TCP SPT=51778 DPT=80 WINDOW=29200 RES=0x00 SYN URGP=0
kernel: [ 3503.584187] [UFW BLOCK] IN= OUT=enp0s8 SRC=192.168.1.44 DST=52.84.13.246 LEN=60 TOS=0x00 PREC=0x00 TTL=64 ID=15002 DF PROTO=TCP SPT=51778 DPT=80 WINDOW=29200 RES=0x00 SYN URGP=0
kernel: [ 3519.712123] [UFW BLOCK] IN= OUT=enp0s8 SRC=192.168.1.44 DST=52.84.13.246 LEN=60 TOS=0x00 PREC=0x00 TTL=64 ID=15003 DF PROTO=TCP SPT=51778 DPT=80 WINDOW=29200 RES=0x00 SYN URGP=0
kernel: [ 3900.250931] [UFW BLOCK] IN= OUT=enp0s8 SRC=192.168.1.44 DST=104.193.19.59 LEN=60 TOS=0x00 PREC=0x00 TTL=64 ID=47090 DF PROTO=TCP SPT=35944 DPT=9999 WINDOW=29200 RES=0x00 SYN URGP=0
kernel: [ 3901.280089] [UFW BLOCK] IN= OUT=enp0s8 SRC=192.168.1.44 DST=104.193.19.59 LEN=60 TOS=0x00 PREC=0x00 TTL=64 ID=47091 DF PROTO=TCP SPT=35944 DPT=9999 WINDOW=29200 RES=0x00 SYN URGP=0
kernel: [ 4201.573248] [UFW BLOCK] IN= OUT=enp0s8 SRC=192.168.1.44 DST=91.189.91.157 LEN=76 TOS=0x10 PREC=0x00 TTL=64 ID=17312 DF PROTO=UDP SPT=43425 DPT=123 LEN=56

==> /var/log/kern.log <==
kernel: [ 3488.126537] [UFW BLOCK] IN= OUT=enp0s8 SRC=192.168.1.44 DST=52.84.13.246 LEN=60 TOS=0x00 PREC=0x00 TTL=64 ID=14998 DF PROTO=TCP SPT=51778 DPT=80 WINDOW=29200 RES=0x00 SYN URGP=0
kernel: [ 3489.152073] [UFW BLOCK] IN= OUT=enp0s8 SRC=192.168.1.44 DST=52.84.13.246 LEN=60 TOS=0x00 PREC=0x00 TTL=64 ID=14999 DF PROTO=TCP SPT=51778 DPT=80 WINDOW=29200 RES=0x00 SYN URGP=0
kernel: [ 3491.168057] [UFW BLOCK] IN= OUT=enp0s8 SRC=192.168.1.44 DST=52.84.13.246 LEN=60 TOS=0x00 PREC=0x00 TTL=64 ID=15000 DF PROTO=TCP SPT=51778 DPT=80 WINDOW=29200 RES=0x00 SYN URGP=0
kernel: [ 3495.392064] [UFW BLOCK] IN= OUT=enp0s8 SRC=192.168.1.44 DST=52.84.13.246 LEN=60 TOS=0x00 PREC=0x00 TTL=64 ID=15001 DF PROTO=TCP SPT=51778 DPT=80 WINDOW=29200 RES=0x00 SYN URGP=0
kernel: [ 3503.584187] [UFW BLOCK] IN= OUT=enp0s8 SRC=192.168.1.44 DST=52.84.13.246 LEN=60 TOS=0x00 PREC=0x00 TTL=64 ID=15002 DF PROTO=TCP SPT=51778 DPT=80 WINDOW=29200 RES=0x00 SYN URGP=0
kernel: [ 3519.712123] [UFW BLOCK] IN= OUT=enp0s8 SRC=192.168.1.44 DST=52.84.13.246 LEN=60 TOS=0x00 PREC=0x00 TTL=64 ID=15003 DF PROTO=TCP SPT=51778 DPT=80 WINDOW=29200 RES=0x00 SYN URGP=0
kernel: [ 3900.250931] [UFW BLOCK] IN= OUT=enp0s8 SRC=192.168.1.44 DST=104.193.19.59 LEN=60 TOS=0x00 PREC=0x00 TTL=64 ID=47090 DF PROTO=TCP SPT=35944 DPT=9999 WINDOW=29200 RES=0x00 SYN URGP=0
kernel: [ 3901.280089] [UFW BLOCK] IN= OUT=enp0s8 SRC=192.168.1.44 DST=104.193.19.59 LEN=60 TOS=0x00 PREC=0x00 TTL=64 ID=47091 DF PROTO=TCP SPT=35944 DPT=9999 WINDOW=29200 RES=0x00 SYN URGP=0
kernel: [ 4201.573248] [UFW BLOCK] IN= OUT=enp0s8 SRC=192.168.1.44 DST=91.189.91.157 LEN=76 TOS=0x10 PREC=0x00 TTL=64 ID=17312 DF PROTO=UDP SPT=43425 DPT=123 LEN=56

==> /var/log/alternatives.log <==
update-alternatives 2018-06-26 21:01:54: run with --install /usr/bin/identify-im6 identify-im6 /usr/bin/identify-im6.q16 10000 --slave /usr/share/man/man1/identify-im6.1.gz identify-im6.1.gz /usr/share/man/man1/identify-im6.q16.1.gz
update-alternatives 2018-06-26 21:01:54: run with --install /usr/bin/stream stream /usr/bin/stream-im6.q16 10000 --slave /usr/share/man/man1/stream.1.gz stream.1.gz /usr/share/man/man1/stream-im6.q16.1.gz
update-alternatives 2018-06-26 21:01:54: run with --install /usr/bin/stream-im6 stream-im6 /usr/bin/stream-im6.q16 10000 --slave /usr/share/man/man1/stream-im6.1.gz stream-im6.1.gz /usr/share/man/man1/stream-im6.q16.1.gz
update-alternatives 2018-06-26 21:01:54: run with --install /usr/bin/display display /usr/bin/display-im6.q16 10000 --slave /usr/share/man/man1/display.1.gz display.1.gz /usr/share/man/man1/display-im6.q16.1.gz
update-alternatives 2018-06-26 21:01:54: run with --install /usr/bin/display-im6 display-im6 /usr/bin/display-im6.q16 10000 --slave /usr/share/man/man1/display-im6.1.gz display-im6.1.gz /usr/share/man/man1/display-im6.q16.1.gz
update-alternatives 2018-06-26 21:01:54: run with --install /usr/bin/montage montage /usr/bin/montage-im6.q16 10000 --slave /usr/share/man/man1/montage.1.gz montage.1.gz /usr/share/man/man1/montage-im6.q16.1.gz
update-alternatives 2018-06-26 21:01:54: run with --install /usr/bin/montage-im6 montage-im6 /usr/bin/montage-im6.q16 10000 --slave /usr/share/man/man1/montage-im6.1.gz montage-im6.1.gz /usr/share/man/man1/montage-im6.q16.1.gz
update-alternatives 2018-06-26 21:01:54: run with --install /usr/bin/mogrify mogrify /usr/bin/mogrify-im6.q16 10000 --slave /usr/share/man/man1/mogrify.1.gz mogrify.1.gz /usr/share/man/man1/mogrify-im6.q16.1.gz
update-alternatives 2018-06-26 21:01:54: run with --install /usr/bin/mogrify-im6 mogrify-im6 /usr/bin/mogrify-im6.q16 10000 --slave /usr/share/man/man1/mogrify-im6.1.gz mogrify-im6.1.gz /usr/share/man/man1/mogrify-im6.q16.1.gz
update-alternatives 2018-06-26 21:01:55: run with --install /usr/bin/x-terminal-emulator x-terminal-emulator /usr/bin/gnome-terminal.wrapper 40 --slave /usr/share/man/man1/x-terminal-emulator.1.gz x-terminal-emulator.1.gz /usr/share/man/man1/gnome-terminal.1.gz

==> /var/log/installer/casper.log <==
This disc is called:
'Ubuntu 18.04 LTS _Bionic Beaver_ - Release amd64 (20180426)'
Copying package lists...gpgv: Signature made Thu Apr 26 18:43:31 2018 UTC
gpgv:                using RSA key D94AA3F0EFE21092
gpgv: Good signature from "Ubuntu CD Image Automatic Signing Key (2012) <[email protected]>"
Reading Package Indexes... Done
Writing new source list
Source list entries for this disc are:
deb cdrom:[Ubuntu 18.04 LTS _Bionic Beaver_ - Release amd64 (20180426)]/ bionic main restricted
Repeat this process for the rest of the CDs in your set.

==> /var/log/fontconfig.log <==
/usr/share/fonts/truetype/sinhala: skipping, existing cache is valid: 1 fonts, 0 dirs
/usr/share/fonts/truetype/tibetan-machine: skipping, existing cache is valid: 1 fonts, 0 dirs
/usr/share/fonts/truetype/tlwg: skipping, existing cache is valid: 58 fonts, 0 dirs
/usr/share/fonts/truetype/ttf-khmeros-core: skipping, existing cache is valid: 2 fonts, 0 dirs
/usr/share/fonts/truetype/ubuntu: skipping, existing cache is valid: 13 fonts, 0 dirs
/usr/share/fonts/type1: skipping, existing cache is valid: 0 fonts, 1 dirs
/usr/share/fonts/type1/gsfonts: skipping, existing cache is valid: 35 fonts, 0 dirs
/usr/local/share/fonts: skipping, existing cache is valid: 0 fonts, 0 dirs
/var/cache/fontconfig: cleaning cache directory
fc-cache: succeeded

==> /var/log/dpkg.log <==
2018-06-27 00:17:36 status installed apparmor-profiles:all 2.12-4ubuntu5
2018-06-27 00:17:36 trigproc man-db:amd64 2.8.3-2 <none>
2018-06-27 00:17:36 status half-configured man-db:amd64 2.8.3-2
2018-06-27 00:17:38 status installed man-db:amd64 2.8.3-2
2018-06-27 00:17:38 configure apparmor-utils:amd64 2.12-4ubuntu5 <none>
2018-06-27 00:17:38 status unpacked apparmor-utils:amd64 2.12-4ubuntu5
2018-06-27 00:17:38 status unpacked apparmor-utils:amd64 2.12-4ubuntu5
2018-06-27 00:17:38 status unpacked apparmor-utils:amd64 2.12-4ubuntu5
2018-06-27 00:17:38 status half-configured apparmor-utils:amd64 2.12-4ubuntu5
2018-06-27 00:17:38 status installed apparmor-utils:amd64 2.12-4ubuntu5

==> /var/log/unattended-upgrades/unattended-upgrades-shutdown.log <==

==> /var/log/boot.log <==
/dev/mapper/ubuntu--vg-root: clean, 164324/10379264 files, 1928530/41497600 blocks
  WARNING: Failed to connect to lvmetad. Falling back to device scanning.
  Volume group "ubuntu-vg" not found
  Cannot process volume group ubuntu-vg
  WARNING: Failed to connect to lvmetad. Falling back to device scanning.
  Reading all physical volumes.  This may take a while...
  Found volume group "ubuntu-vg" using metadata type lvm2
  WARNING: Failed to connect to lvmetad. Falling back to device scanning.
  2 logical volume(s) in volume group "ubuntu-vg" now active
/dev/mapper/ubuntu--vg-root: clean, 164321/10379264 files, 1928587/41497600 blocks

==> /var/log/apt/term.log <==
Unpacking apparmor-utils (2.12-4ubuntu5) ...
Selecting previously unselected package apparmor-profiles.
Preparing to unpack .../apparmor-profiles_2.12-4ubuntu5_all.deb ...
Unpacking apparmor-profiles (2.12-4ubuntu5) ...
Setting up python3-libapparmor (2.12-4ubuntu5) ...
Setting up python3-apparmor (2.12-4ubuntu5) ...
Setting up apparmor-profiles (2.12-4ubuntu5) ...
Processing triggers for man-db (2.8.3-2) ...
Setting up apparmor-utils (2.12-4ubuntu5) ...
Log ended: 2018-06-27  00:17:38

==> /var/log/apt/history.log <==
Commandline: apt-get remove apparmor-profiles
Requested-By: tokyoneon (1000)
Remove: apparmor-profiles:amd64 (2.12-4ubuntu5)

Commandline: apt-get install apparmor-profiles apparmor-utils
Requested-By: tokyoneon (1000)
Install: python3-libapparmor:amd64 (2.12-4ubuntu5, automatic), apparmor-profiles:amd64 (2.12-4ubuntu5), python3-apparmor:amd64 (2.12-4ubuntu5, automatic), apparmor-utils:amd64 (2.12-4ubuntu5)

==> /var/log/gpu-manager.log <==
Skipping "/dev/dri/card0", driven by "vboxvideo"
Skipping "/dev/dri/card0", driven by "vboxvideo"
Does it require offloading? no
last cards number = 1
Has amd? no
Has intel? no
Has nvidia? no
How many cards? 1
Has the system changed? No
Single card detected

==> /var/log/auth.log <==
CRON[7210]: pam_unix(cron:session): session closed for user root
sudo: pam_unix(sudo:auth): conversation failed
sudo: pam_unix(sudo:auth): auth could not identify password for [tokyoneon]
sudo: tokyoneon : TTY=pts/3 ; PWD=/home/tokyoneon ; USER=root ; COMMAND=/bin/su
sudo: pam_unix(sudo:session): session opened for user root by (uid=0)
su[7307]: Successful su for root by root
su[7307]: + /dev/pts/3 root:root
su[7307]: pam_unix(su:session): session opened for user root by (uid=0)
systemd-logind[859]: Existing logind session ID 2 used by new audit session, ignoring
systemd-logind[859]: New session c3 of user root.

==> /var/log/bootstrap.log <==
update-initramfs: deferring update (trigger activated)
Setting up ubuntu-minimal (1.417) ...
Processing triggers for libc-bin (2.27-3ubuntu1) ...
Processing triggers for systemd (237-3ubuntu10) ...
Processing triggers for ca-certificates (20180409) ...
Updating certificates in /etc/ssl/certs...
0 added, 0 removed; done.
Running hooks in /etc/ca-certificates/update.d...
done.
Processing triggers for initramfs-tools (0.130ubuntu3) ...

==> /var/log/auth.log <==
su[7307]: pam_unix(su:session): session closed for user root
sudo: pam_unix(sudo:session): session closed for user root
systemd-logind[859]: Removed session c3.
sudo: tokyoneon : TTY=pts/3 ; PWD=/home/tokyoneon ; USER=root ; COMMAND=/bin/su
sudo: pam_unix(sudo:session): session opened for user root by (uid=0)
su[7329]: Successful su for root by root
su[7329]: + /dev/pts/3 root:root
su[7329]: pam_unix(su:session): session opened for user root by (uid=0)
systemd-logind[859]: Existing logind session ID 2 used by new audit session, ignoring
systemd-logind[859]: New session c4 of user root.
Эта команда найдет любой файл (-type f) с расширением .log (\(-name «*.log»\)) в каталоге /var/log и использует tail для вывода информации по мере обновления этих логов (-е). Каждый файл журнала будет заключен в стрелочки ascii (==> filename.log <==). Любой, кто хочет найти какие-либо аномалии в своей системе, найдет это средство полезным для себя.
Галопом по Европам …
На этом мы завершаем нашу серию по укреплению и настройке вашей системы Ubuntu… Ну, во всяком случае, пока.
Как мы упоминали в начале этой серии, это руководство не является полным или комплексным подходом к обеспечению безопасности системы Linux. Есть много модификаций уровня ядра, которые пользователи могут выполнить для дальнейшего улучшения устойчивости Ubuntu к различным атакам. Можно предпринять определенные шаги, чтобы защитить загрузчик, обеспечить более эффективную политику паролей для входа в систему, защитить общую память, анонимно просматривать Интернет и многое другое.
Операционные системы Linux обладают невероятным потенциалом в качестве платформы для пользователей, ориентированных на безопасность. Мы рекомендуем пользователям Windows и Mac купить на Амазоне эту книгу про Ubuntu и вот эту замечательную книгу по безопасности Linux, чтобы лучше понять операционную систему Ubuntu и то, как она работает.